

My custom made room replica project.
Shown above is my room, and a while back I decided to start working on making a 1/12 scale replica of it for various reasons. One main reason being the fact I'll probably have to be moving in the not too distant future and I rather like this room so it'd be nice to take it with me where ever we go. I might not have any control over when/where we move, but at least I'll have this.
Another reason is simply playing with figs, and imagining them as being life size.
Another reason is simply playing with figs, and imagining them as being life size.

- 01/26/14 -
First step was to plan things out.
First step was to plan things out.
It's a bit sloppy but I spent a good deal of time just trying to figure out how to approach the room.
one of the problems was figuring out how to make the walls removable, since I wanted to be able to photograph the room easily from angles not just from above. After a ton of measuring it was time to get stated.

- 02/03/14 -
This is how my mini room would begin. Not much to see here.

- 02/06/2014 -
Once I had an idea of what to do, it was time to start cutting the pieces out.
Once I had an idea of what to do, it was time to start cutting the pieces out.

- 02/11/2014 -
Bit more progress on the walls, not much to see here.
Bit more progress on the walls, not much to see here.

- 02/19/2014 -
At this point the room is starting to come together. Unfortunately I failed to see I put that door wall in upside own and backwards. but it ended up not being to much of a problem. Much of what you see in the image are just supports for the floor to be placed above.
At this point the room is starting to come together. Unfortunately I failed to see I put that door wall in upside own and backwards. but it ended up not being to much of a problem. Much of what you see in the image are just supports for the floor to be placed above.

- 03/15/2014 -
Here I had just completed work on my closet. Took some time to get the sliding effect right. also shown is some fabric just to see how the carpet would look.
Here I had just completed work on my closet. Took some time to get the sliding effect right. also shown is some fabric just to see how the carpet would look.

- 03/19/2014 -
Here you can see most of the basic room is built. Added in a working door and figure I might attach a background behind the space latter on.
Here you can see most of the basic room is built. Added in a working door and figure I might attach a background behind the space latter on.

- 03/22/2014 -
I was lucky enough to have a lot of extra paint laying around, the same stuff used to paint my real room. this was a process that took like a week. The walls warped during the painting process which was pretty lame, but I was able to fix the problem by just painting the opposite sides of the walls and laying them flat with some weights. while it wasn't part of the original plan, I finally figured out how to make the walls easily detachable. At first I thought of peg holes, then magnets, even bought some velcro straps but ended up using guide rails to slide the walls in and out.
I was lucky enough to have a lot of extra paint laying around, the same stuff used to paint my real room. this was a process that took like a week. The walls warped during the painting process which was pretty lame, but I was able to fix the problem by just painting the opposite sides of the walls and laying them flat with some weights. while it wasn't part of the original plan, I finally figured out how to make the walls easily detachable. At first I thought of peg holes, then magnets, even bought some velcro straps but ended up using guide rails to slide the walls in and out.

- 03/23/2014 -
Started working on some of them shelves. nothing too complicated here. although getting the wires cut and bent to shape was slightly tricky.
Started working on some of them shelves. nothing too complicated here. although getting the wires cut and bent to shape was slightly tricky.

- 04/01/2014 -
This is from when I started applying the carpet, which took some real careful cutting/gluing.
This is from when I started applying the carpet, which took some real careful cutting/gluing.
It also shows how the walls are made to be dropped into place for easy viewing.

- 04/01/2014 -
After finishing the shelves I started working on my couch, figured it's be a big part of the room so it should be the first piece of furniture I work on. that and I might get rid of it when I move.
After finishing the shelves I started working on my couch, figured it's be a big part of the room so it should be the first piece of furniture I work on. that and I might get rid of it when I move.

- 04/03/2014 -
Left a figma in the photo so you can get an idea of the scale.
Left a figma in the photo so you can get an idea of the scale.

- 04/06/2014 -
These are parts for my book/dvd shelf.
These are parts for my book/dvd shelf.

- 04/11/2014 -
boy was this bookshelf was a tricky assembly. Had to make a bracket just to keep the sides lined up while gluing it together.
boy was this bookshelf was a tricky assembly. Had to make a bracket just to keep the sides lined up while gluing it together.

- 04/12/2014 -
Finished my bookshelf here. thing was kinda a pain, what with getting all the parts lined up properly and what not. Tried printing out some posters and stuff but seems the color ink in my printer crapped out. Shana wallscroll was fine so I used it but the aria one needs to be reprinted, I'm only holding it there with some tape to see how it looks.
This room sure is real slow goings, it's been taking months to get this far.

- 04/13/2014 -
some in progress work on the couch. making it functional, with a back that can go up and down, has proven to be a challenge from a design stand point, but whatever should be done in a day or two. Should also point out the material I'm using to cover it is taken from the original couch, it was peeling off anyways so I figured why not.
some in progress work on the couch. making it functional, with a back that can go up and down, has proven to be a challenge from a design stand point, but whatever should be done in a day or two. Should also point out the material I'm using to cover it is taken from the original couch, it was peeling off anyways so I figured why not.

- 04/23/2014 -
This is how my corner display shelve things started out.
This is how my corner display shelve things started out.

- 04/27/2014 -
I must say, these were a pain in the butt becuase of how technical they were and trying to get the angels and what not right.
I must say, these were a pain in the butt becuase of how technical they were and trying to get the angels and what not right.
- 04/30/2014 -
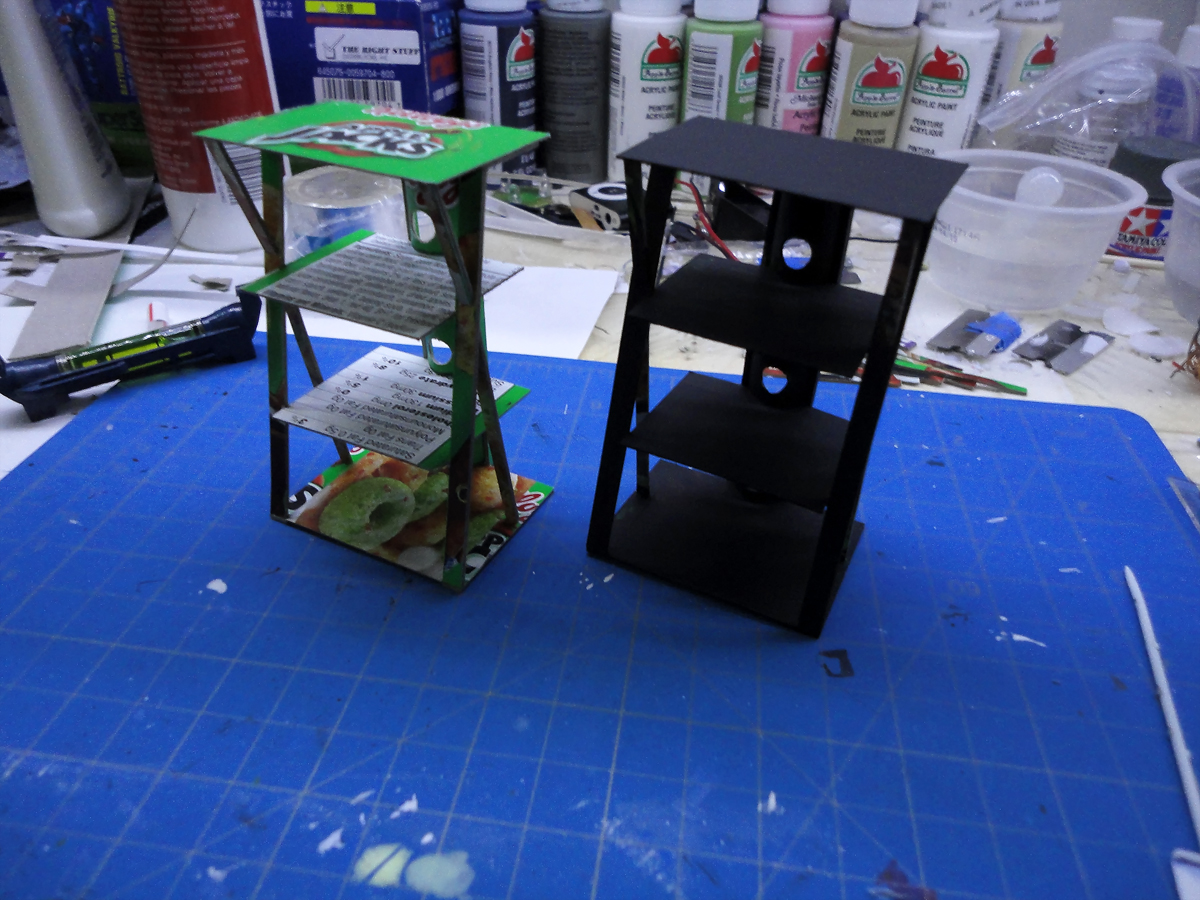
Just in case you think it looks strange to make them out of cereal boxes, you can see a side by side with one painted.

- 05/06/2014 -
So at this point I finished up the couch and the display shelves in the corners. Couldn't find any chrome paint so just used the silver I got, and after spilling out to much of it I scrambled to make some other items I could paint silver so as to not waste the paint, that being the speakers.
I made that nyaruko figma box for something unrelated to this room, but I like leaving it around in there all the same.

- 05/19/2014 -
My dresser half done. I could have finished this thing a lot quicker if I didn't make it functional, but where would be the fun in that?
My dresser half done. I could have finished this thing a lot quicker if I didn't make it functional, but where would be the fun in that?

- 05/17/2014 -
This is based off a table I made a few years ago from a broken hair I admittedly ended up half assing it and not giving it as much detail underneath as I could have, but again it's underneath so you wont see it anyway.
This is based off a table I made a few years ago from a broken hair I admittedly ended up half assing it and not giving it as much detail underneath as I could have, but again it's underneath so you wont see it anyway.

- 05/19/2014 -
This is the completed dresser, painted inside and out. while the shape's not very accurate, the handles were made from pieces of soda cans flipped inside out.
This is the completed dresser, painted inside and out. while the shape's not very accurate, the handles were made from pieces of soda cans flipped inside out.

- 05/20/2014 -
As you can see, it's really starting to take shape.
As you can see, it's really starting to take shape.
I went and made some bases for some tiny keychain figs I had. since before I even started this I had no clue how to do my figs, and eventually figured
I'd just copy them with a 3d scanner and reprint scaled down versions and
paint em. unfortunately I can't afford a 3d printer and might never. I'd rather not leave to many things in there that aren't in
my real room but they kinda work.
I think the Takane fig looks kinda off though, like a little too big maybe. The Tohno one though is the perfect size I think, just about what a 1/8 would be.
I think the Takane fig looks kinda off though, like a little too big maybe. The Tohno one though is the perfect size I think, just about what a 1/8 would be.

- 06/09/2014 -
I put off working on my display cases becuase I couldn't find large enough pieces of clear plastic to do them, but I was able to manage enough to start work on this case here.
I put off working on my display cases becuase I couldn't find large enough pieces of clear plastic to do them, but I was able to manage enough to start work on this case here.

- 06/26/2014 -
Here's the done case. I think the finish came out nicely and looks like the full size one (used airbrush for it), but the hinges and bolts came out like ass.
Here's the done case. I think the finish came out nicely and looks like the full size one (used airbrush for it), but the hinges and bolts came out like ass.

- 07/05/2014 -
Next up was this tv stand thingy.It's basically a wide and short version of the corner units. I hated working on this becuase of all the angels. it ended up coming out all sorts of crooked and shitty but you can't really tell so I just said fuck it and went with it since I don't wanna remake it and it's gotta be made sooner or latter.
Next up was this tv stand thingy.It's basically a wide and short version of the corner units. I hated working on this becuase of all the angels. it ended up coming out all sorts of crooked and shitty but you can't really tell so I just said fuck it and went with it since I don't wanna remake it and it's gotta be made sooner or latter.

- 07/14/2014 -
I finally managed to find enough clear plastic for my other display case, but the plastic was curved which caused a lot of problems
I finally managed to find enough clear plastic for my other display case, but the plastic was curved which caused a lot of problems

This is the nearly completed case. needs some touching up still and maybe some more detailing.
I should point out that this is based on the detolf from ikea. These display cases are very popular with collectors of all kinds due to their reasonable pricing compared to other display cases out there, that and display cases for collectibles simple aren't very easy to find and usually require being custom built. With that in mind I don't know why ikea doesn't produce more variations of display cases. They clearly have a monopoly on a popular product and should expand on it. well whatever.

It took a while but I was finally able to get a color ink replacement for my printer.
It might come off as somewhat cheating but I feel that the ac unit would be way to hard to due without just using an image of the thing. might have to do it again though since the shadows aren't right on it.

This is the nearly complete display case in place. still needs touching up as mentioned before, but it's 'okay' for the time being so I figured I'd work on other stuff.

Finally got around to reprinting this wall-scroll, and giving it some detailing.
Someday I'll get around to filling that bookshelf with dvds and stuff.
Took a minute to decide if I wanted to glue the wall scroll in place or hang it.
On the real wall scroll the cables holding it on place are nearly invisible (fishing line) so it shouldn't have looked too odd without strings, but I figured it'd look better with them.

Thought I'd take the chance to toss in the Miho figma I recently acquired (review coming soon).
Started putting up some posters which I think really livens up the room and adds some much needed detail and color. Found a small delorian (no not a micro-machine) which works nicely.
I'm planing on adding working lights to the room eventually, what you see is from outside lamps. I've got it mostly planed out, just waiting on some ordered parts... which will probably take a while to show up.
Once I'm done with the posters I'll probably start working on my arcade machine or tv. For my tv I'm planing on making the thing fully functional after finding out a psp screen would only be 4mm smaller than what my tv would be in 1/12 scale. 4mm is close enough for something like that I think.
my arcade machine will probably take a while, haven't given any thought to how I'll do it yet.
 - 07/30/2014 -
Made another two framed posters. Just got one more to do and I'll start up my arcade thingy. Still waiting on the components to start installing lights, it'd be nice to not have to drag the room over to my light box every time I wanna take pics with it. without the light box they don't come out very good as seen above.
Thought about going on to do the tv but when I took apart my spare psp I found the cables connecting the screen to the mother board were way too short and wouldn't work for my project. should work with an older model though, I'll see if I can get one for cheap. only really need it to play videos after all.
 - 08/05/14 -
Started working on my arcade machine. Kept having to remind myself it's just a cabinet since I kept over thinking it and not wanting to work on it.
Also decided to do some psps on the side, both on and off versions.
 - 08/18/14 -
I kinda lost the motivation to work on my room for a while here. still, I tried to force myself to get at least something done. It's not much but figured I'd do an update anyway. The graphics shown took me like a week to create. The only images I could find online were of poor quality at best. I had to combine them with dozens of photos I took of my machine and edit them with Photoshop for a while. The part with the buttons wasn't a problem becuase I found a decent image online with the only difference to the one on my real machine being the blue circles near the top which are black on mine. I don't like having them stuck on there before I do the paining, but I figured it was necessary to get the proper shape cut out.
 - 08/20/14 -
So at this point I finally felt like working a bit. You can't see it in this image but there's a box bellow that button pad keeping the thing in place and at a tilt. Not much else to say here not already mentioned in that last update. planing on creating a system that would let me place screencaps from various games behind the screen I'll be putting in place, hoping it turns out well.
 - 08/28/14 -
So here we have the finished arcade machine. It's based off a quasicade jr I bought from a used furniture store just outside of town (same place I got the first display case I built).
Theres a few things I could have done better, like raised buttons in place of printed ones, and I got a bit of paint on the game pad's bottom corner. whatever it's fine. never gonna finish this room if I nitpick too much, taking me long enough as is.
 - 08/28/14 -
Took this photo of a bit of comparison. wanted to have more of the dvds/cds done before taking it but still need to scan more stuff and edit it before printing, and no it's not two photos edited together.
I designed the arcade machine so printed out screen caps would fit between the plastic screen and the grey area behind. I'll take a pic one I get to that.and yeah also shown is the last of my poster frames that I made. unfortunately I couldn't find the original image used for the poster, so I have to take a photo of my poster and edit it. The photos used in the poster I already had saved and was able to edit those in easily. still, the clouds don't really match and get darker near the bottom. but that might not bee too noticeable.
As far as furniture goes, I still have two chairs, a table, a tv and bunkbed/computer desk. Also by couch is getting more and more uncomfortable everyday and I plan on replacing it. so I might have to remake than for the new one if/when I do.
 - 10/04/14 -
boy it sure has been a while since my last update.
After the arcade machine I had planed on working on the lights for my room, but was never able to figure something out. LED strips were too ugly and el-wire was too dim. Ended up losing motivation and haven't done anything with the room for a long time. I have however recently managed to get hold of a scrap psp and as I may have mentioned before I've had the idea of using a psp screen for the tv in my room. Well I finally got around to testing out some homebrew on the psp which lets me stream the desktop from my psp called 'PSPdisp'. This would make things a lot easier than converting videos and popping a card in and out all the time.
One of the reasons why I put this off was becuase I thought I'd have to cut apart the ribbon cable that connects the screen to the motherboard, extend it and reattach it. reason for this being to still have access to the psp buttons. However, I also came across a nice homebrew called 'Autostart', which lets the psp go right into the streaming mode as soon as the psp is turned on without having to press any buttons at all. now I wont have to worry about the length of the ribbon cable when I put the screen in place.
- 10/05/14 -
Unfortunately I killed the psp shown in the last update above while trying to implement it into the room. What happened was I was trying to use a spare screen for a psp model 1000 I've had laying around, as the one that came with the psp shown had a stuck pixle, and the spare one had protective film on it that gave it a finish closer to my tv. Problem was the power connecter for that screen is very finicky and required you push down on it for it to work properly. So I tryed setting up some stuff to hold it down, tryed with a paperclip but that seemed to connect with some parts on the motherboard and fried/shorted out something. Now nether screen will work on that psp. So I have to put the tv on hold untill I manage to find another good deal on a psp.
 - 12/13/14 -
It took a while but I finally got the motivation to start working on this project again.
Here as you can see I'm starting work on the bunk bed/computer desk. Not much else to say about it but it's definitely a big part of the room that will take up a fair amount of space... which is kinda why I put it off for so long. There's also the fact that it'll probably interfere with how the wall is removed so I'll have to rework that eventually.
 - 12/25/14 -
slow goings I know but I've been a bit busy.
Here I added on some extra detail to my dvd rack. A few months ago I scanned all my dvds and edited them to size in photoshop then printed them out. some are pure paper craft others I added some cardboard in to hold their shapes better. The real bitch will be doing the rack of videogames I keep in the space bellow those dvds. If nothing else they'll take a good long while to scan and edit.
oh, I found a new psp to use, but unfortunately it needs some repairs before I can use it and I can't freaking fine my soldering kit anywhere. basically I can't install the software because the battery connection is loose which wont let me update the psp or hack it.
 - 12/31/14 -
Made another two framed posters. Just got one more to do and I'll start up my arcade thingy. Still waiting on the components to start installing lights, it'd be nice to not have to drag the room over to my light box every time I wanna take pics with it. without the light box they don't come out very good as seen above.
Thought about going on to do the tv but when I took apart my spare psp I found the cables connecting the screen to the mother board were way too short and wouldn't work for my project. should work with an older model though, I'll see if I can get one for cheap. only really need it to play videos after all.
Started working on my arcade machine. Kept having to remind myself it's just a cabinet since I kept over thinking it and not wanting to work on it.
Also decided to do some psps on the side, both on and off versions.
I kinda lost the motivation to work on my room for a while here. still, I tried to force myself to get at least something done. It's not much but figured I'd do an update anyway. The graphics shown took me like a week to create. The only images I could find online were of poor quality at best. I had to combine them with dozens of photos I took of my machine and edit them with Photoshop for a while. The part with the buttons wasn't a problem becuase I found a decent image online with the only difference to the one on my real machine being the blue circles near the top which are black on mine. I don't like having them stuck on there before I do the paining, but I figured it was necessary to get the proper shape cut out.
So at this point I finally felt like working a bit. You can't see it in this image but there's a box bellow that button pad keeping the thing in place and at a tilt. Not much else to say here not already mentioned in that last update. planing on creating a system that would let me place screencaps from various games behind the screen I'll be putting in place, hoping it turns out well.
So here we have the finished arcade machine. It's based off a quasicade jr I bought from a used furniture store just outside of town (same place I got the first display case I built).
Theres a few things I could have done better, like raised buttons in place of printed ones, and I got a bit of paint on the game pad's bottom corner. whatever it's fine. never gonna finish this room if I nitpick too much, taking me long enough as is.
Took this photo of a bit of comparison. wanted to have more of the dvds/cds done before taking it but still need to scan more stuff and edit it before printing, and no it's not two photos edited together.
I designed the arcade machine so printed out screen caps would fit between the plastic screen and the grey area behind. I'll take a pic one I get to that.and yeah also shown is the last of my poster frames that I made. unfortunately I couldn't find the original image used for the poster, so I have to take a photo of my poster and edit it. The photos used in the poster I already had saved and was able to edit those in easily. still, the clouds don't really match and get darker near the bottom. but that might not bee too noticeable.
As far as furniture goes, I still have two chairs, a table, a tv and bunkbed/computer desk. Also by couch is getting more and more uncomfortable everyday and I plan on replacing it. so I might have to remake than for the new one if/when I do.
boy it sure has been a while since my last update.
After the arcade machine I had planed on working on the lights for my room, but was never able to figure something out. LED strips were too ugly and el-wire was too dim. Ended up losing motivation and haven't done anything with the room for a long time. I have however recently managed to get hold of a scrap psp and as I may have mentioned before I've had the idea of using a psp screen for the tv in my room. Well I finally got around to testing out some homebrew on the psp which lets me stream the desktop from my psp called 'PSPdisp'. This would make things a lot easier than converting videos and popping a card in and out all the time.
One of the reasons why I put this off was becuase I thought I'd have to cut apart the ribbon cable that connects the screen to the motherboard, extend it and reattach it. reason for this being to still have access to the psp buttons. However, I also came across a nice homebrew called 'Autostart', which lets the psp go right into the streaming mode as soon as the psp is turned on without having to press any buttons at all. now I wont have to worry about the length of the ribbon cable when I put the screen in place.
- 10/05/14 -
Unfortunately I killed the psp shown in the last update above while trying to implement it into the room. What happened was I was trying to use a spare screen for a psp model 1000 I've had laying around, as the one that came with the psp shown had a stuck pixle, and the spare one had protective film on it that gave it a finish closer to my tv. Problem was the power connecter for that screen is very finicky and required you push down on it for it to work properly. So I tryed setting up some stuff to hold it down, tryed with a paperclip but that seemed to connect with some parts on the motherboard and fried/shorted out something. Now nether screen will work on that psp. So I have to put the tv on hold untill I manage to find another good deal on a psp.
It took a while but I finally got the motivation to start working on this project again.
Here as you can see I'm starting work on the bunk bed/computer desk. Not much else to say about it but it's definitely a big part of the room that will take up a fair amount of space... which is kinda why I put it off for so long. There's also the fact that it'll probably interfere with how the wall is removed so I'll have to rework that eventually.
slow goings I know but I've been a bit busy.
Here I added on some extra detail to my dvd rack. A few months ago I scanned all my dvds and edited them to size in photoshop then printed them out. some are pure paper craft others I added some cardboard in to hold their shapes better. The real bitch will be doing the rack of videogames I keep in the space bellow those dvds. If nothing else they'll take a good long while to scan and edit.
oh, I found a new psp to use, but unfortunately it needs some repairs before I can use it and I can't freaking fine my soldering kit anywhere. basically I can't install the software because the battery connection is loose which wont let me update the psp or hack it.
Bit more work on the bed/computer desk, not much to report.

- 01/11/15 -and a bit more progress.
I'll keep updating this post as I get more parts of the room finished so check back latter.
I'll keep updating this post as I get more parts of the room finished so check back latter.
the detail is amazing, your very resourceful
ReplyDeletevery impressive
ReplyDelete